Every spring, I’ve been putting the same tired geraniums on the porch near the front door. This year I decided I needed something different – I mean, don’t we all? – and I’ve chosen to go all-in on a mixed container planting to bring a shot of color to the doorstep. And while I have my own thoughts about what I like in a container, I wanted to get some fresh ideas and pointers that I can pass along. I called on Dana Stein, Gardens of Babylon’s procurement director, who was more than eager to share her knowledge of how to put together successful containers.
Before you begin
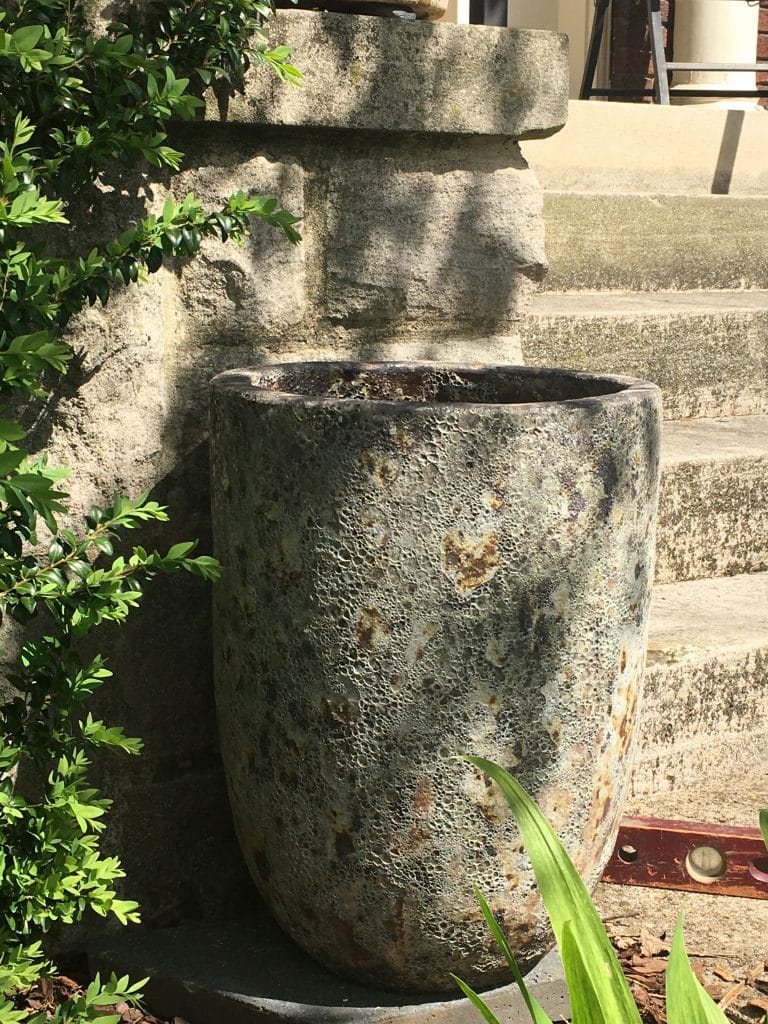
You may already have a container, or you may be in the market for a new one. Check out this article for suggestions on how to choose the best container, then fill it with good, high quality planting mix. “Don’t skimp on the soil,” Dana suggests. “Remember that you get what you pay for.” Then let the fun begin.
“The first thing to consider is if your planter will be in sun or shade,” Dana says. That, of course, will determine what you will put in it. A pot on a porch that receives sunshine all day will need sun- and heat-tolerant plants; a porch in dappled or full shade needs plants that don’t need as much sun to thrive. It’s important to know the conditions on your doorstep.
“Go to a good garden center and you’ll find sun-loving plants in one location, shade plants in another,” Dana says. Walk around and think about what you like: “Think about colors. Do you like warm colors? Bright? That will help you narrow it down.” And think about how to put them together for the best look, and what excites you: “Just do a gut check – what makes you happy?”
Thriller, filler, spiller
It’s an old but valid rule for putting together successful container plantings: Start with something tall and bold – a “thriller” plant. Add a mid-size “filler” or two, something that is eye-catching, adds color and texture, and fills the bulk of the garden space. Finally, finish with a “spiller,” something that will trail over the sides to add softness, more texture, and more interest.
“Everyone knows about this; all the pros know it,” Dana says. “Use this formula, and that’s going to make you look like a professional.”
When you plant, begin with the thriller, and consider the angles from which the garden will be seen; if it’s out in the open, place the tall plant in the center of the container and fill in all around it. If the container will be against a wall or other backdrop – as mine will be – place the tallest plant at the back of the pot, and let the fillers and spillers take front and center.
What’s the ideal number of plants to use? As many as it takes. “Pack them in!” Dana suggests. “Make it instant gratification. You want the end result to look like it’s already grown and spilling over, even after it’s just been planted.”
Care and maintenance
Plants are growing, living things, so you have to be attentive to their needs, Dana says. A container garden needs frequent watering, sometimes daily during extremely hot weather. “Put your finger in the soil two inches deep, just to check. Every day,” Dana says. “If it’s over 90 degrees, definitely containers will need to be watered every day.” Ideally, the pot is lifted a bit off the ground with pot feet or risers, she suggests. “When you water, you want to see water come out the bottom of the pot.”
The garden will also need nourishment. “Plants in containers are heavy feeders,” she says. When you water, the nutrients will leach out the bottom.” A good organic fertilizer is a must-have part of the regimen. “It’s like a healthy diet for the plants. They’ll look better if they’re being fed well.”
A bit of cosmetic attention is also necessary. “Just like we need to get haircuts and trim our fingernails. Every so often they need to be deadheaded, clipped and trimmed, especially if things start to get leggy. Get a good pair of pruners and tidy things up a little bit.”
What’s trending in container plantings?
“People are getting out of the box with their containers,” Dana says. Tropical selections that we usually think of as houseplants – snake plant, for instance – are showing up in summer container gardens, and make big statements in a planting. “Also, the oldest plant known to man, reed plants, have been really popular.” This upright, architectural bit of greenery can be an excellent “thriller,” and something a little unusual for a container.
Lower-growing annuals, grasses, and plants that provide texture as well as color are also popular choices for mixed containers, she says. Ivies, thyme and other trailing plants are the “spillers” to look for. “Just think about what makes you happy,” Dana says.
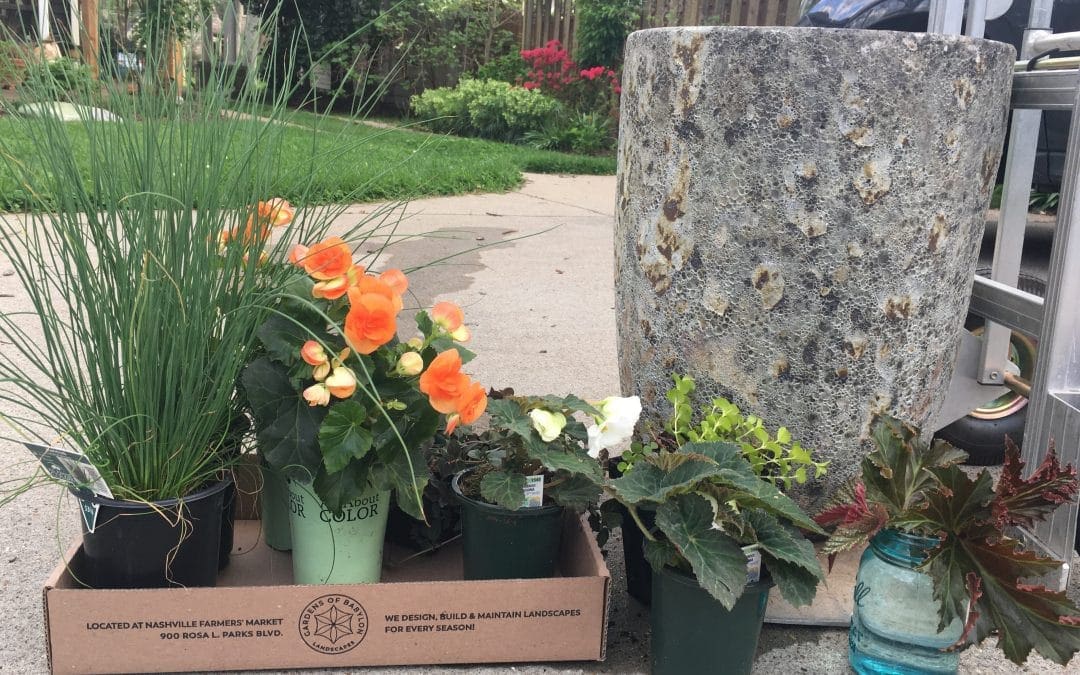
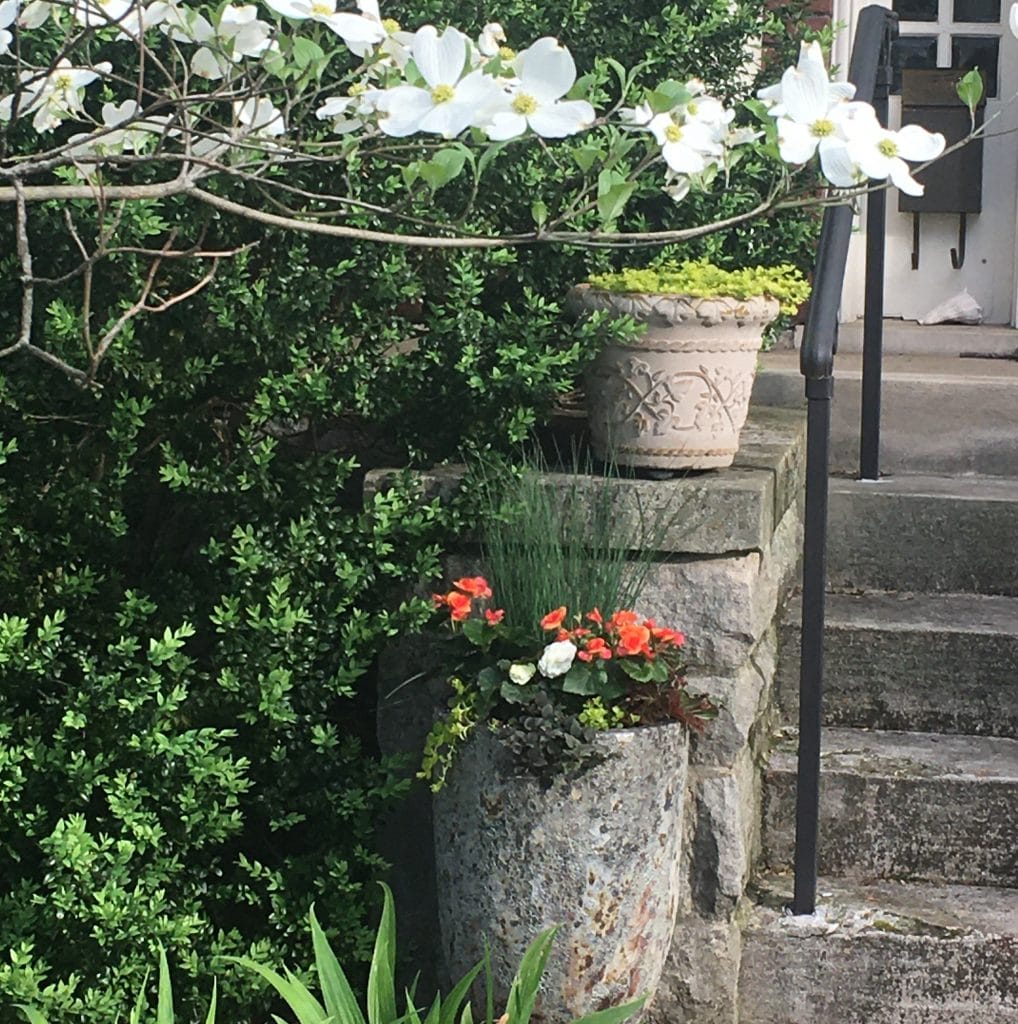
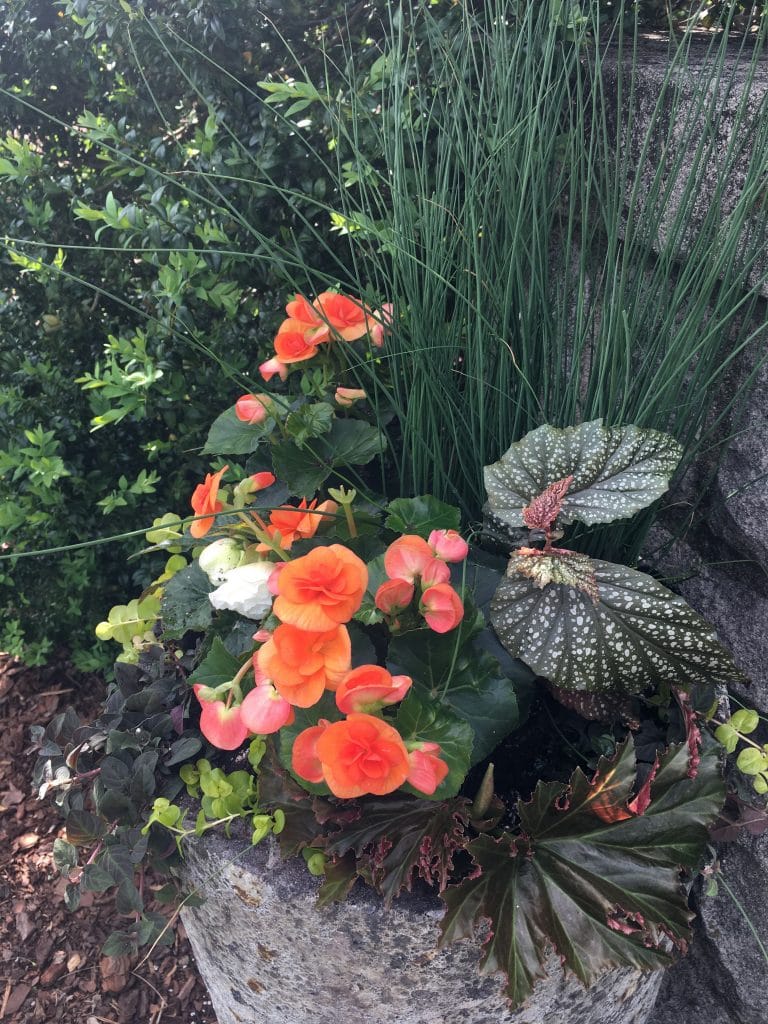
For the container at my doorstep, which will be in dappled shade most of the day, I walked around the garden center and remembered how much I like the more unusual varieties of begonias. I’d planned to start with the tall, architectural vibe that a reedy plant provides – in this case, Equisetumhyemal, or horsetail – but was drawn to the tall, sometimes spiraling growth of Juncus ‘Twisted Arrows.’
I chose two different begonias for their large, showy flowers, Hiemalis ‘Amstel Batik Orange’ and a tuberous variety, ‘Nonstop White.’ To those I added cuttings from two pass-along begonias already in my collection, an angel-wing variety and a type with large frilly leaves – official names unknown. A new, purplish creeping Jenny — Lysimachia ‘Midnight Sun’ — and the bright green Lysimachia variety that I dug out of containers I’ve had for years, spill over the rim of the pot in my new begonia garden.
If the spot for your container garden is sunny, Dana suggests a variety of sun-loving plants: container-size sunflowers, black-and-blue salvia, ‘Million Bells’ petunias, dwarf zinnias, a selection of kitchen herbs – the choices and combinations are endless.
“Remember the ‘thriller-spiller-filler’ rule, and go for the look that makes you happy,” Dana suggests.
Click here to watch Dana Stein demonstrate how to plant a container garden in “Container Planting 101.” Browse the Gardens of Babylon Garden Center, 900 Rosa L. Parks Blvd., for containers and for ideas of what to put in them.
Hey, my name is Dana with Gardens of Babylon and todaywe’re going to talk about August container planting and I’m going to give you some tips and tricks.
All right so for August containers this is a transition month, we’re moving out of summerinto fall and so our containers have been really going strong all season long and this is the time to just sort of look and see what’s going on, like can we salvage anything do we need to get our pruners out and maybe tidy up a little bit and deadhead.
Tidying up and deadheading the containers
This container actually looks amazing you can see the lavender is just really flush and the Lantana. I do see this is very common so this cute these coral bells we’re just gonna do a little bitof deadheading. You don’t have to go all the way down to the base, I just want to sort of tidy up a little bitand get anything that’s kind of got its thingout. So that’s the first stepfor your containers.
So now that we’ve sort of tidied up a little bit we’re going to look and see if there’s any dead spots is there anything that we could sort of liven up a little bit. Some containers you will have to pull some things out because they’ve just sort of done their thing for the season.
Transition Plants: Summer to Fall
But these are some great transition pieces. This is a Snapdragon it’s a great transitional piece because it takes still our hot summer heat and it will actually transition into fall and take some frost so this is perfect. Ifeel like we’ve got a little bit of a bare spot so i will come in and just tuck in this color right here it’s going to be perfect.
Most peopledon’t realize that Lantana does take a little bit of cold as well. So another fun idea other than Snapdragonsis we, I love to use vegetables in my fall containers. This is a Chard it’s a bright lights chard and you can see it’s multi the different plants they’re going to be like yellows and bright reds. So this would be another thing to pop in and this is going to grow up and give you some color as it starts to turn coldand you can eat it which is amazing.
Succulents are also a an idea to add because this is still drought hot and you want to have things that are going to take that drought in that heat that’s not going to require so muchwatering.
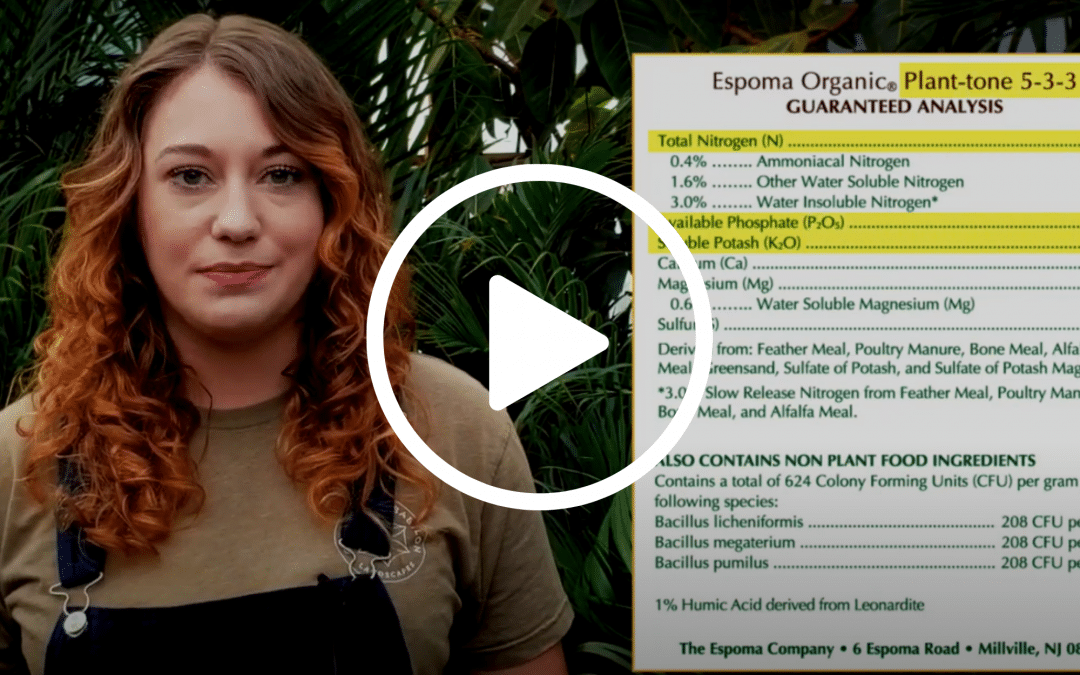
August is a fertilizing month
August is a time to fertilize, fertilize and fertilize because your pods have been going strong all season long and so it’s time to sort of give them a little bit of a rejuvenation. I either love to use like a good organic fertilizer liquid organic fertilizers are amazing and actually just spill it onto the foliage because right away that fertilizer if it’s liquid will go straight into the plant and work straight away.
Another thing we’re going to talk about is how to sort of amend the soil on top let’s talk about that next. All right so in August we don’t necessarily have to go in and take out soil and add new soil what i like to do is called top dressing.
So i just love to use a natural soil conditioner it’s a cross between a really fine mulch and almost could be soil and it decomposes very very quickly because it’s very fine. I love to use soil conditioner and i like to just put it on the top of the soil in and around all of my containers this time of year.
All right so this is it for august container planting tips the main thing is just have fun if you need to add some new things find things that spark joy for you it’s the little things in life.
There are 2 key parts to prepping you plants for spring: fertilization and acclimating plants to the outdoors.
Fertilization
Start fertilizing houseplants about 8 weeks before the last expected spring frost. Here in Nashville, that’s mid-late April. The first few fertilizer applications should be made at half the recommended strength. Help acclimate your plant slowly to receive fertilizer again!
Most houseplant fertilizers contain a mixture of both macro- and micronutrients.
The three primary macronutrients, nitrogen, phosphorus, and potassium, found in a container of fertilizer are listed as a ratio on the front of the bottle or bag. Called the N-P-K ratio, these numbers tell you the percentage of each of those nutrients inside the container.
Some of our favorite fertilizers are Monty’s All Purpose and Good Dirt Plant Food, These products are great for most general houseplant applications and can easily be diluted in a watering can. Feeding your plants will help you replace the minerals and nutrients that are lacking in your potting soil.
Acclimating
When you take a plant from its indoor environment and place it outside suddenly, the plant can easily become stressed as a result of shock. Do this gradually, and your plants will love you for it!
You shouldn’t place any houseplant in direct sunlight outdoors. Instead, seek out a nicely shaded area, perhaps your patio or under a tree, and allow your plants to take in the fresh air for a few hours each day. Then gradually move them to an area allowing a little sunshine and slowly increase their time outdoors, even leaving them out all day. After a couple weeks, the houseplants should be well adapted to their outdoor setting to remain throughout summer.
Outside temperatures can vary greatly from indoors as well, and since the majority of houseplants originate from tropical-like regions, they cannot tolerate cold temperatures or anything below 55 F.
You may also be dealing with pests. Inside, houseplants are not typically bothered by insects or other pests so much as they are outdoors. Become familiar with some of the more common insects pests so you’ll be better prepared at fighting them off.
Bi-weekly preventative Neem oil applications will help deter any pests from making your plants a home.
A garden specialist once passed on this bit of wisdom: “The best thing you can do is put a fifty-cent plant in a five-dollar hole.” He didn’t mean that literally, of course, but the lesson was clear: For optimal houseplant health, make sure you pay attention to the soil you grow it in!
That goes for plants in the garden, but also for your houseplants. Regular garden soil is not suitable for plants meant to grow indoors, as it is too heavy to allow houseplants to drain well, and may contain contaminants and soil-borne diseases that could harm indoor plants.
Potting mix – technically not soil as we think of it in a garden bed – is usually a mixture of ingredients such as peat moss, sphagnum moss, perlite, vermiculite, pine bark or other components that help with aeration and drainage that houseplants require. Potting mix may also contain fertilizer. It’s often labeled as sterile because it doesn’t contain the pathogens found in outdoor soil.
Match the mix
All-purpose potting mix is fine for many of your houseplants, having the loose, fluffy texture required for plants’ roots to cling, and drains well enough that it won’t cause roots to rot. But some plants have more specific needs, and there are mixes for those plants, as well.
Succulents and cacti,
which grow in the wild in places where there is very little rain, need soil that drains fast. A potting mix for these plants may contain more sand.
Orchids and bromeliads
grow best in a mix that contains bark, which provides good drainage and the air flow through the mix that the plants’ roots require. This acidic mix is especially good for bromeliads.
African violet
mix is a lighter, more porous mix that may contain sphagnum moss, vermiculite, perlite and coarse sand for better drainage than regular potting mix.
Palms
– cousins to those tropical beach beauties —have specific needs that most often include a fast-draining mix, but some palms may prefer a slightly heavier medium. Some houseplant experts recommend using African violet mix with a bit of sand mixed in.
Spring refresh
Not all houseplants need to be repotted every year, but for those that have outgrown their pots or are struggling in depleted potting mix, now is a good time for this task. Here’s a refresher on how to do it:
Line the bottom of the new pot with a porous material to cover the drainage hole, then fill the pot about two-thirds full of new potting mix.
Remove the plant out of the old pot by turning it upside down with your hand against the old mix. Don’t pull the plant by its stem; slide the rootball out and gently squeeze and pull at the soil and roots to loosen them. Unwind roots that have grown around the old mix inside the container.
Place the rootball on top of the layer of potting mix inside the new pot and fill in around with more so that it’s planted at the same depth as it was in its old home. You may want to add a little water at this point to settle the soil before topping it off with a bit more. Water the newly potted plant thoroughly.
Potting mix for all types of houseplants is available at Gardens of Babylon’s Garden Center. Check out our repotting expert Paige’s plant-repotting video demonstration here, and visit the Gardens of Babylon Garden Center to pick out new plants for your indoor garden.
We plant people have a hard time picking favorites. Nevertheless, there’s always something that stands out in our ever-expanding collections of houseplants and landscape selections. We polled the staff at Gardens of Babylon to find out what’s catching the attention of fellow plant-lovers lately.
Indoors
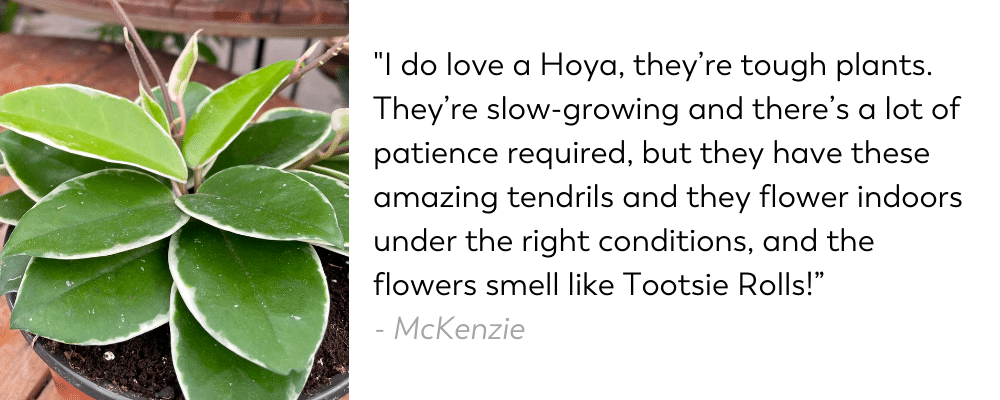
(Hoya – commonly called wax plant —enjoys bright, indirect light. Keep the soil moist in spring and summer, water less frequently in winter. Occasional misting to raise humidity is recommended).
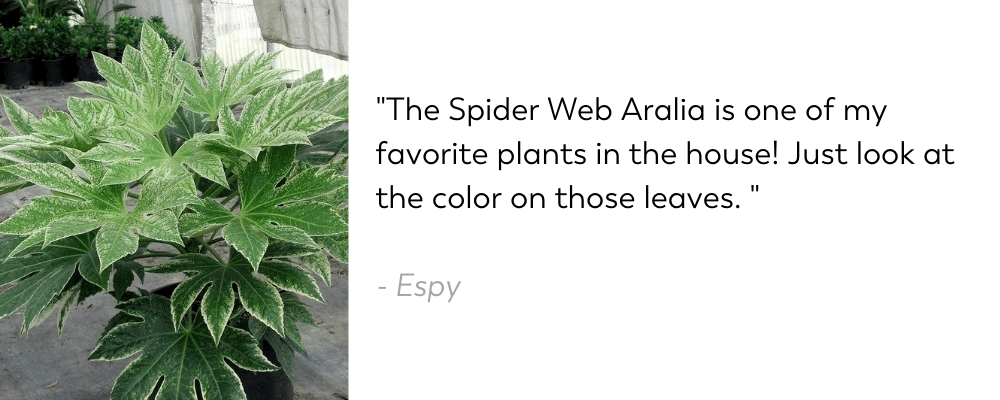
(Fatsia japonica ‘Spider Web’: Grows best in a sunny window with moderate/bright light. Water when the soil is dry.
This tropical beauty grows well in a container in a shady spot outdoors in summer.)
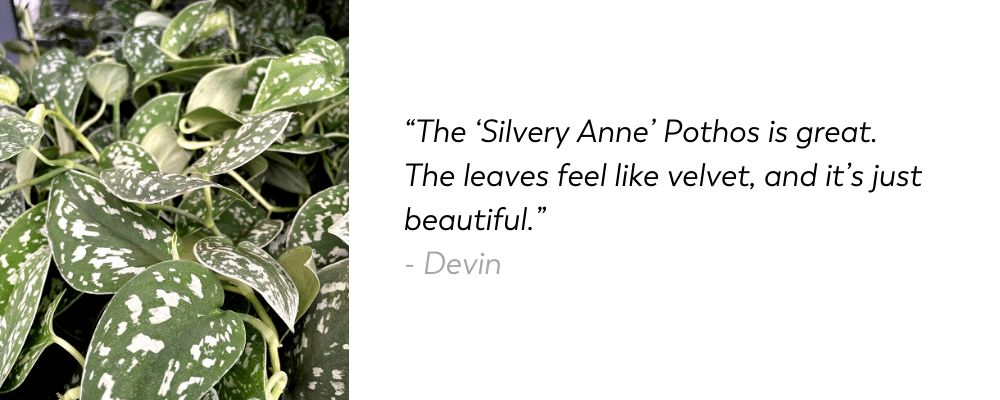
(In general, Pothos – Epipremnum aureum — prefers bright, indirect light but can tolerate low light; variegated
varieties may lose variegation if light is too low. Water as needed; they also tolerate occasional dry soil.)
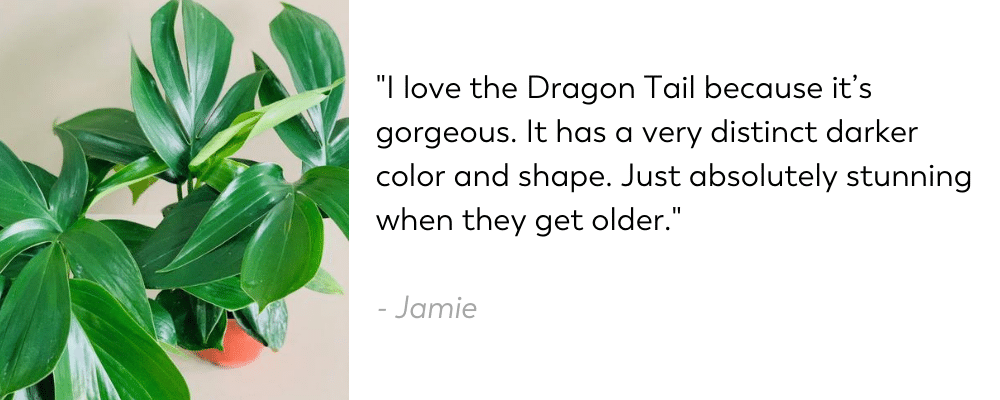
(Epipremnum ‘Dragon’s Tail’prefers bright, indirect light. Keep the soil consistently moist during spring and summer; water less in winter.)
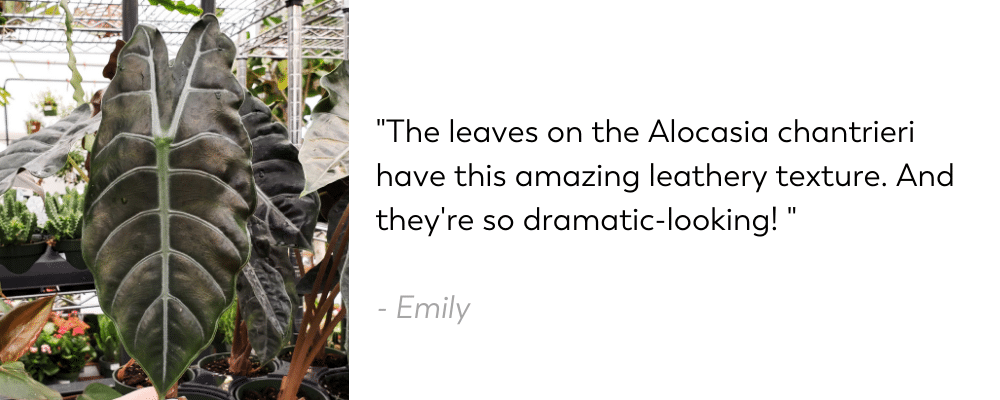
(Alocasia chantrieri thrives in bright, indirect light; allow the top couple of inches of
soil to dry out between watering. This plant welcomes a humid environment.)
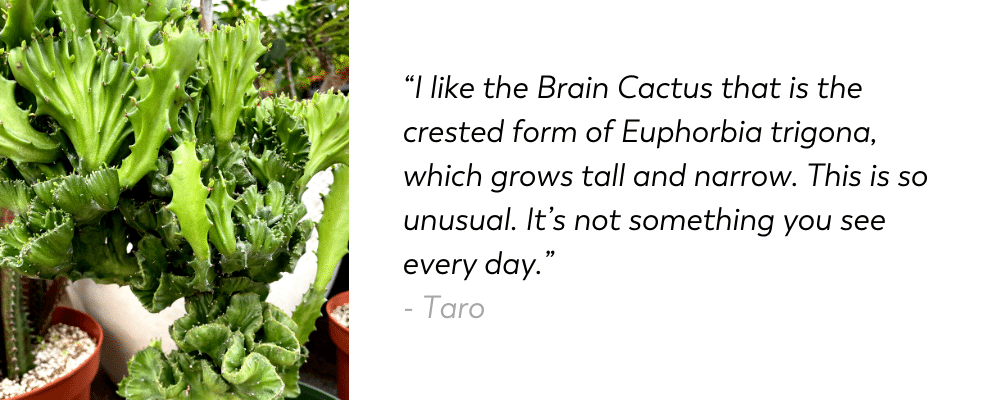
(Grow Euphorbia trigona in a sunny location, using cactus soil mix in a pot that drains well.
Water regularly during spring and summer, but allow the soil to dry in the top few inches.)
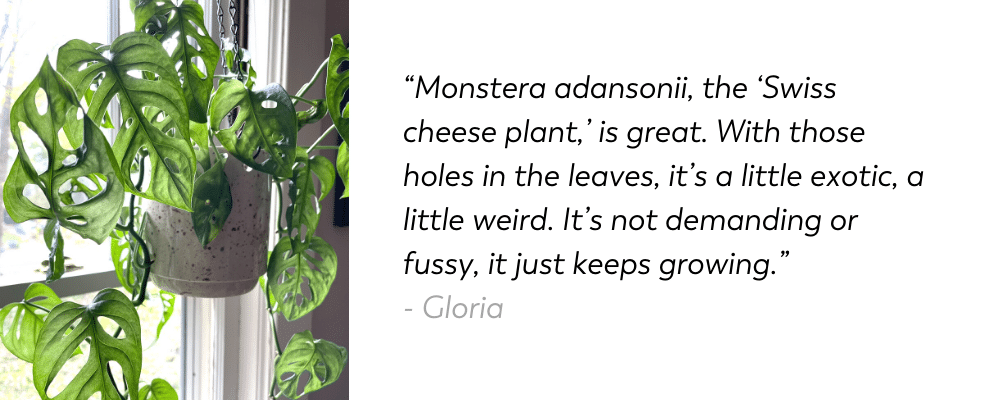
(Monstera adansonii thrives in bright, indirect light in a pot that drains well, and it
appreciates a bit more humidity. The vine can be grown in a hanging pot or trained to climb a moss pole.)
In the Landscape
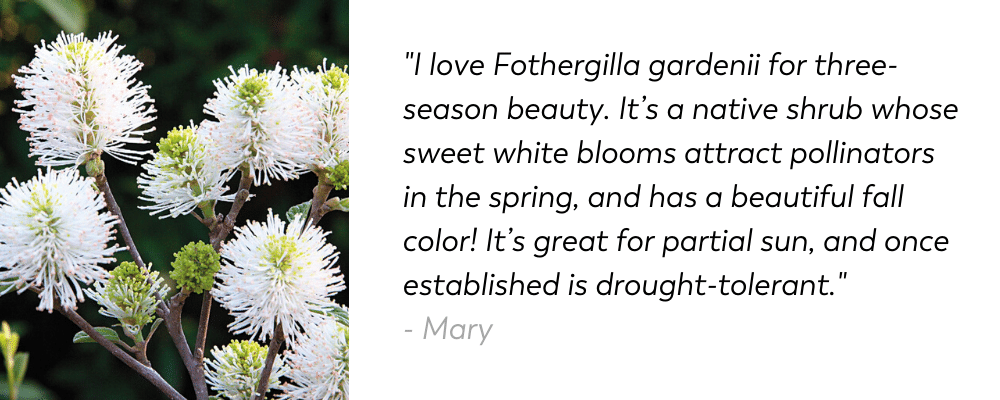
(Fothergilla gardenii, commonly known as dwarf fothergilla, grows in full sun to part shade as a spring-blooming shrub; flowers are best in full sun.)
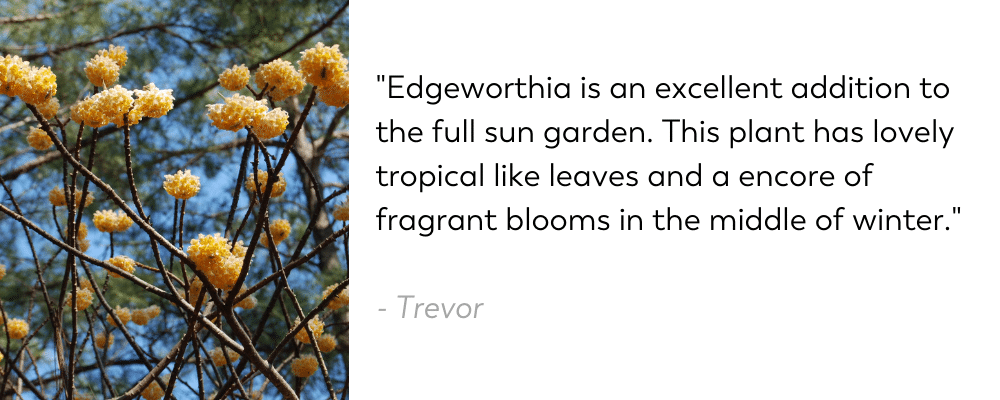
(Paperbush is the common name for Edgeworthiachrysantha. It grows
best in full sun to part shade in humus-rich, moist but well-drained soil.)
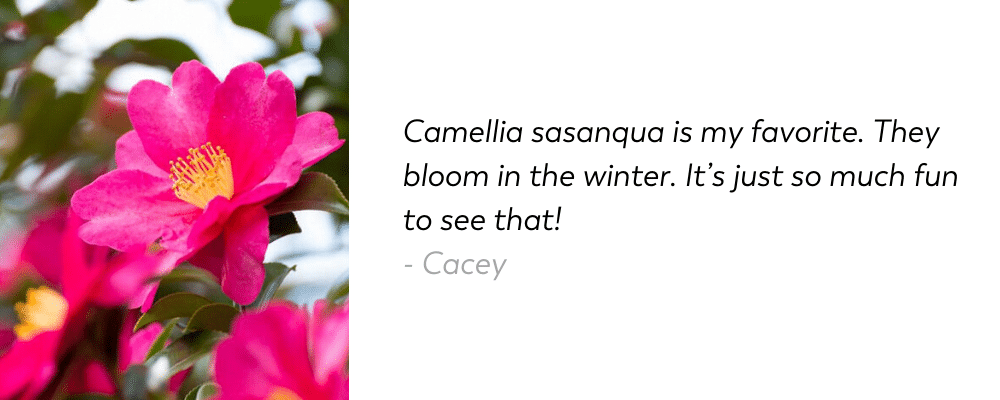
(Evergreen Camellia sasanqua is generally winter-hardy in Middle Tennessee.
It prefers evenly moist, well-drained acidic soil in part-shade.)
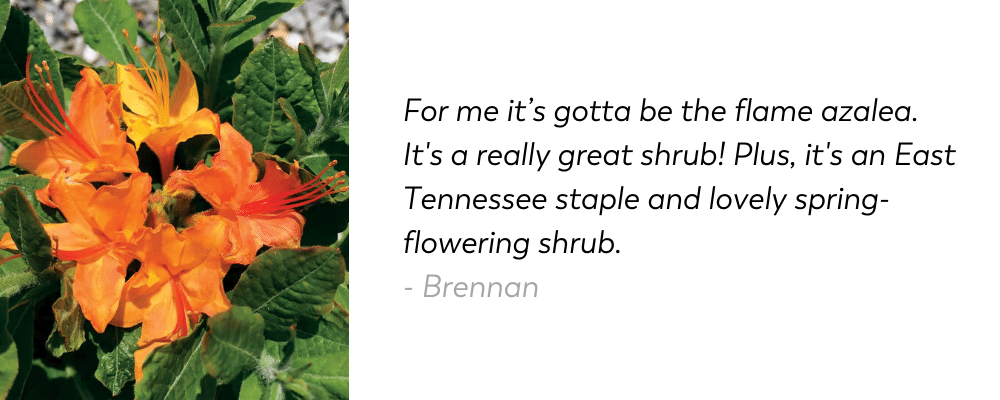
(Grow flame azalea — Rhododendroncalendulaceum – in light, acidic,
well-drained soil in sun-dappled shade. The showy yellow-to-orange flowers attract butterflies in spring.)
——————————————–
Visit the Gardens of Babylon Garden Center at 900 Rosa L. Parks Blvd. to find your favorite plants for indoors or in the landscape.