
by Emily Vogler | Aug 29, 2023
We were honored to outfit the 2023 Southern Living idea home with plants! Yes, that’s right – all the plants you see in the home are courtesy of your friends at G.O.B.! This house is an absolute dream – keep reading for a mini tour of the house. Photos courtesy Southern Living, a division of TI Lifestyle Group, LLC. Southern Living is a registered trademark of TI Lifestyle Group, LLC and is used with permission. Photo Credit: Laurey Glenn/Southern Living.

From Southern Living: “The Tennessee countryside is musical. The land rolls here, dipping into tree-spangled valleys then cresting into grassy knolls that stretch toward the sky. But unlike the rollicking melodies of nearby Nashville, about 30 miles northeast, the rhythms of the Leipers Fork area are a bit more relaxed, with honky-tonk tunes and neon lights taking a back seat to birdsong and starry skies. In other words, it was a pitch-perfect choice for the site of our 2023 Idea House—a reimagined farmhouse that honors its surroundings and encourages gracious hospitality.”

The plants in each room bring a breath of fresh air and add life. This home would have a completely different vibe if it weren’t for the plants! Plants possess a remarkable ability to transform the ambiance of any room they inhabit. Their verdant foliage brings a touch of nature’s serenity indoors, creating a soothing and refreshing atmosphere. The vibrant hues and varied textures of leaves and petals infuse a burst of color and life, instantly revitalizing even the dullest spaces. Beyond aesthetics, plants actively purify the air, releasing oxygen and absorbing toxins, thereby enhancing the overall air quality. Their presence also fosters a sense of tranquility and connection to the natural world, promoting relaxation and reducing stress. Whether perched on windowsills, adorning shelves, or hanging gracefully from ceiling hooks, plants hold the power to imbue a room with an enchanting and revitalizing energy.

From Southern Living: “It was very natural for me to be inspired by the landscape when I considered the color palette, textures, and general energy of the house,” notes Laura. “We always aim for sustainability in our design plans, so we picked out materials that made sense for the property.” The footprint of the structure also takes its cues from the 67 acres surrounding it, with a main house that unfolds along the hilltop plus a garden folly and a multipurpose barn that snugly flank the pool and open-air entertaining space out back. “We thought it should be a home that looked like it had been there for a while, something that seemed settled and original,” says Bill. “We wanted it to appear as if the grounds had developed around the house, instead of the other way around,” adds Luke. Through architecture that prioritizes livability and interiors that feel harmonious with the land, our team crafted a bucolic retreat that is mindfully rooted in its environment and also intentionally designed for the future.” We love how important a factor that nature was when constructing this house! And special shout-out to our friends at Hatcliff Construction who helped create this house.


by Emily Vogler | Aug 28, 2023
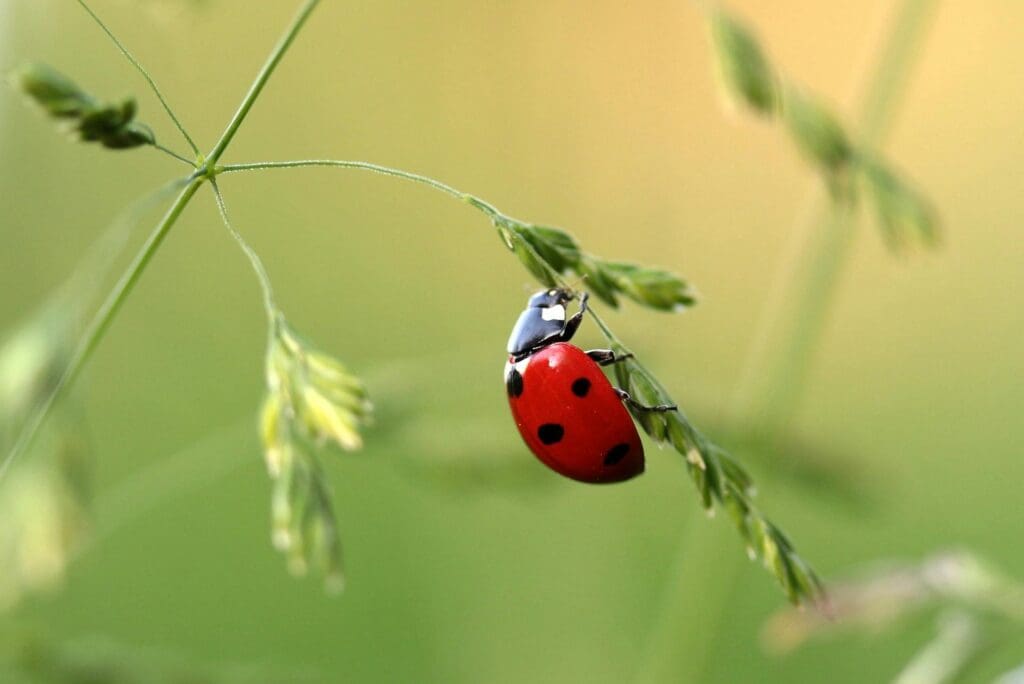
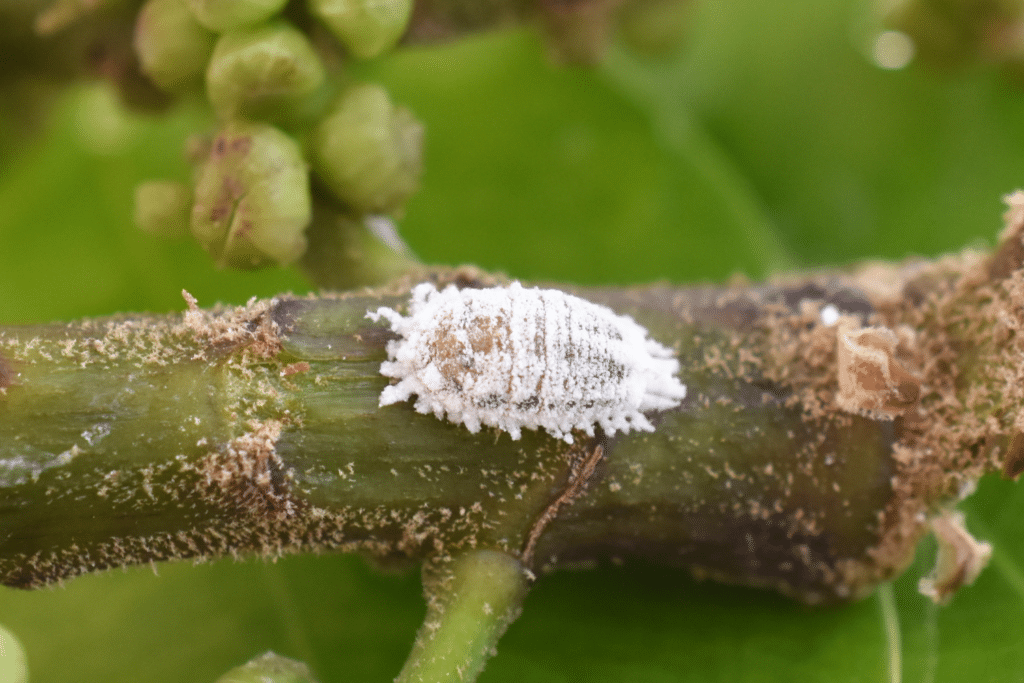
Many gardeners and houseplant owners are familiar with using ladybugs for pest control – they love aphids, right? You can purchase ladybugs anywhere online, and release them in your garden, home, or greenhouse. We even posted on Instagram about our garden center using ladybugs for pest management last year. But did you know that most ladybugs you purchase are wild-caught? Did you know they’re harvested in the Sierra Nevada mountains, and are not native to Tennessee? After attending a lecture featuring Bug Lady Suzanne, of Buglady Consulting, our staff learned that ladybugs are not always ideal pest controllers – it’s the Lacewing that we’re looking to for sustainable pest management. Suzanne provided us with tons of fantastic information, and changed our minds on the use of ladybugs in a garden center. Want to learn more? Keep reading!
Why not Ladybugs?
To start, Ladybugs, or Convergent Ladybird Beetles, are not 100% carnivorous. For some species of ladybug, more than half their diet is pollen – they’re pollinators before predators. This being said, they are not as effective predators for soft-bodied pests like aphids or mealybugs. Also, ladybugs are often wild-caught in the Sierra Nevada mountain range – this means that they are mostly native to California. Around 14% of all wild ladybugs carry Microsporidia – a contagious fungus. These wild-caught ladybugs, when brought to other parts of the country, spread Microsporidia. These ladybugs aren’t native elsewhere and are meant to be there and nowhere else.

Another downside to wild-harvested ladybugs is that they are often harvested while they are hibernating. This is a negative, because if the ladybugs are fat and happy and you release them in your garden, they aren’t going to want to feed on pests and other insects. Most likely, due to their migratory nature, the ladybugs will travel to another location and disperse. On the contrary, if you have acres and acres of farmland or plants, ladybugs could be a good choice. You could release ladybugs, and they would travel far to find other food sources. If you have a targeted area you are trying to treat, such as a greenhouse, the adult ladybugs would be released and then they’d likely leave the area.
Another issue with ladybugs is that they are rather difficult to farm-raise. Ladybugs often carry parasites, and removing the parasitoids can prove difficult even after generations of careful breeding. Also, ladybugs have a very specific diet. Trying to create a diet that a ladybug is happy to eat is very hard. They require lots of specific protein and pollen, and even then they could turn their tiny noses up at the food provided. They are labor-intensive to grow and due to this, no large productions of ladybug rearers exist. Farmed ladybugs are much more expensive than wild-caught, which just perpetuates the need to harvest them from the wild.
Why choose Lacewings?
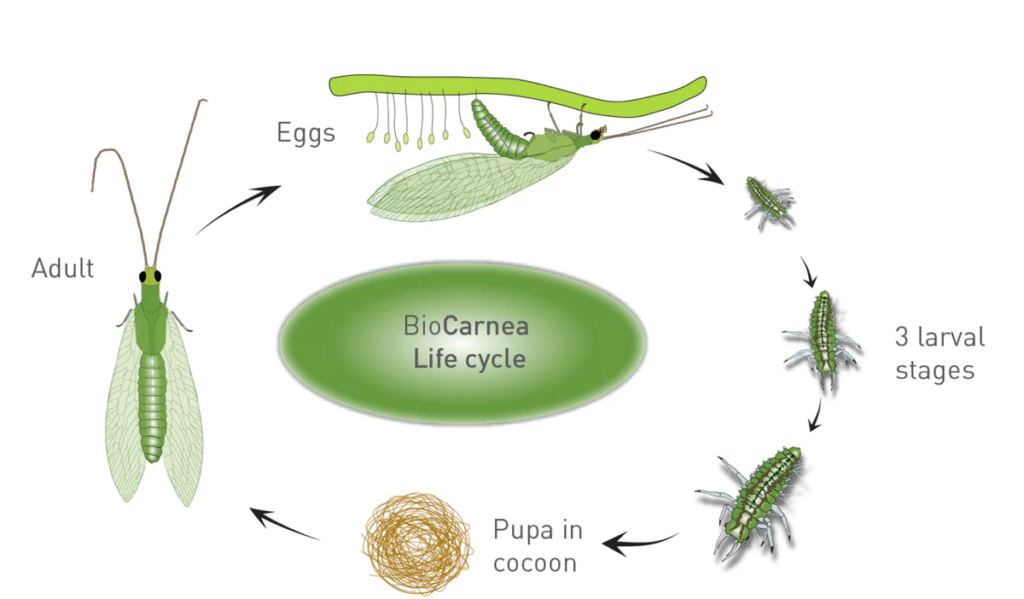
Lacewing larvae are the perfect pest management insect. Their larvae are glued onto “egg cards” with dead moth eggs. These moth eggs provide the larvae with a meal when they first emerge so they can get a boost as soon as they’re born. The larvae are voracious predators and can eat hundreds of soft-bodied insects shortly after hatching. They’re a fantastic generalist predator. Another benefit is that the larvae cannot fly in their adolescent stage, so they don’t leave once they hatch. It’s an enormous benefit to have in a garden center, as we don’t want them to leave! Lacewings can target specific sites, and they are very focused predators.

Another benefit is the sustainability aspect – lacewings are not wild-caught. Lacewings are farmed in controlled environments, so they don’t have parasites or diseases. They’re easy to purchase online, and you can know that they were not wild-harvested and sustainably raised. Plus, once the larvae enter into adulthood, they are no longer predators – they become pollinators. They fly from flower to flower, pollinating as they go. They drink honeydew produced by aphids and then lay eggs near the aphids so their offspring will have food to eat once they’re born.
At Gardens of Babylon, if you stop in to our garden center you can see some lacewing larvae egg cards placed strategically throughout the greenhouses! Stop by and see for yourself. We love learning new things, and pride ourselves in staying educated and up-to-date on sustainable pest management and the reduction of pesticide use.

by Emily Vogler | Aug 2, 2023
Occasionally, a homeowner with a big yard presents a landscape designer with an existing canvas and envisions its full potential through a revitalizing transformation. The property might boast a well-rooted landscape that needs to be updated! In this case, the homeowner collaborated closely with Gardens of Babylon, partnering with our skilled designer, Max, to realize this vision. Soak in these awesome before-and-afters as Max sheds light on the what went into its evolution:


What did the homeowners want?
The homeowners were in search of a revitalization for their mature yet overlooked landscape, characterized by rampant overgrowth and plant casualties resulting from the harsh winter freeze of 2022. “Some of their existing landscaping was totally wiped out from the harsh winter temperatures. Just lots of loss – especially on evergreens. We came in and replaced it all,” Max recounts. Max’s objective was centered around modernizing the 20-year-old landscaping, with a focus on rectifying problems of overcrowding and inappropriate plant positioning. Of particular importance was the substantial undertaking of clearing away a substantial layer of mulch, which had accumulated over the years, in order to invigorate the soil and to reestablish the planting beds.


What do you think is the best feature?
“My absolute favorite feature is the sweet bay magnolia I added. It’s a personal favorite tree of mine,” Max says. The standout of this property shines through its pristine and rejuvenated landscaping, exuding a captivating sense of structured elegance. The introduction of various elevation levels for plantings has not only enhanced its visual appeal but also ensured ample room for a diverse array of ground cover. The crowning touch is the meticulously selected ground cover comprising ajuga, sedum, and daylilies, which gracefully complements the entire composition.

What was the biggest challenge?
“The scale of new plant materials needed was in itself a significant endeavor,” Max explains. “Adding to that, we were working within a tight timeframe, so we needed a balance between swiftness and precision in executing the project.” Max focused on intricate aspects, meticulously arranging and situating big quantities of plants with strategic planning. The sheer exertion needed to uproot and remove plants that have succumbed to frost damage or decay, followed by the replacement with vibrant new growth, demands a substantial amount of labor! Max knocked this project out of the park.


The Gardens of Babylon landscape design team is ready to help with you landscaping needs. Click here to book a consultation with a member of the design team.
by Emily Vogler | Aug 1, 2023
It’s hard to think July is almost over and August is already here! August is the month that summer starts coming to an end and this is the time you really need to take advantage of your landscaping to keep it looking beautiful. This is mainly a maintenance month, making sure your landscape is properly watered and weed free. Here are some tips to ensure your landscape stays in tip top shape:
- If your grass is dry, do not mow until you have watered or until it rains.
- Prune dead or broken branches of trees and shrubs but avoid major pruning until the dormant season.
- Watch susceptible ornamental plants for iron deficiency (yellowed leaves with darker green veins), aggravated by the hot dry weather, and treat with chelated iron if needed. Drench plants and avoid contact with hard surfaces that will stain.
- Plant fall flowering perennials such as asters and chrysanthemums.
To begin your next project, schedule a phone consultation!
If you would like to work with your existing designer, simply fill in their name in the “Project Details” section.
by Emily Vogler | Jul 21, 2023
Moving houseplants outdoors can be great for their growth and overall health. Especially here in Tennessee – abundant sunshine, high humidity, and plentiful rainfall create ideal conditions for tropical plants. However, it’s important to consider a few other factors that can affect your houseplants outside. Here are some considerations to keep in mind when deciding to move your houseplants outdoors.

1. Increased sunlight
Good or bad, outdoor plants receive more direct sunlight compared to indoor plants. Sunlight is essential for photosynthesis, the process by which plants convert light energy into chemical energy, allowing them to grow and thrive. Placing your houseplants outside exposes them to natural sunlight, which can enhance their growth and promote healthier foliage. However, keep in mind that not all plants need or can handle full sunshine. For example, most cactus varieties need and enjoy full sun all day, but many philodendron varieties will burn their leaves if left in the sun for too long. Do your research!

2. Natural air circulation
In indoor settings, air circulation tends to be limited, resulting in the accumulation of dust, pollutants, and stagnant air. By relocating plants outside, they can benefit from natural air movement, which prevents the buildup of harmful substances and promotes fresher air, creating an environment conducive to optimal growth. Enhanced air circulation facilitates improved transpiration and nutrient absorption in plants, further contributing to their overall well-being.

3. Temperature and humidity benefits
Outdoor conditions generally provide a wider range of temperature and humidity levels than indoor environments. Exposing your houseplants to these natural fluctuations can stimulate their growth and encourage stronger root development – just like their natural environment. Additionally, increased humidity outdoors can be beneficial for plants that thrive in a humid environment. Philodendrons, Anthuriums, and most other tropical plants absolutely love high humidity, and may even grow out of control with all the extra moisture! Keep an eye out for mildew if your plants are getting too wet, and again – do your research. Not all plants need 60% humidity or more. A good rule of thumb is that plants with thicker leaves – like succulents – need less humidity to thrive.
4. Pest control
Many common houseplant pests, such as spider mites, aphids, and mealybugs, thrive indoors and outdoors. Though there are beneficial insects outdoors – like ladybugs – that can control pests, it’s important to know that pests can still be an issue. You will want to have a pest management regiment in place if you plan to have houseplants outdoors. Using neem oil is a great way to combat any pest issues. The best part about neem oil is that it does not harm the plant in any way when used in the correct way. Here is our blog on common houseplant pests, and how to get rid of them.

5. Larger growth
When deciding to move your houseplants outdoors, be prepared for remarkable growth! If your plants are already thriving, being in an outdoor environment will further enhance their well-being. Anticipate rapid growth, larger leaves, and stronger root systems. However, as the cooler months approach, it will be necessary to bring your houseplants back inside, and some of them might have grown significantly. Be ready to do some pruning if space becomes an issue due to their newfound size.
As we mentioned earlier, please keep in mind that not all houseplants can tolerate outdoor conditions. Some plants may be sensitive to direct sunlight, temperature extremes, or specific weather conditions. Before moving your houseplants outside, research their specific needs and consider factors like plant species, sunlight requirements, and local climate conditions to ensure they will thrive outdoors.

