by Emily Vogler | Apr 11, 2023
If you want to have a hands-on terrarium-building experience, check out our upcoming Terrarium Building Workshop!
We love terrariums because it feels like you’re creating your own mini world that you can then maintain and nurture for years to come! Not only are they aesthetically pleasing statement pieces that can be used as home decoration, but they’re also like living art that when maintained correctly can live for years – and even decades in the right containers! If you’re testing out your green thumb, but don’t have the space to add large indoor plants, then a lush, beautiful terrarium can be the perfect alternative to add some greenery into your space. It’s ideal for small space dwellers, beginners, and busy plant parents since they don’t take up too much space, and they’re easy to maintain. It’s also a great hobby and chic décor for your home.
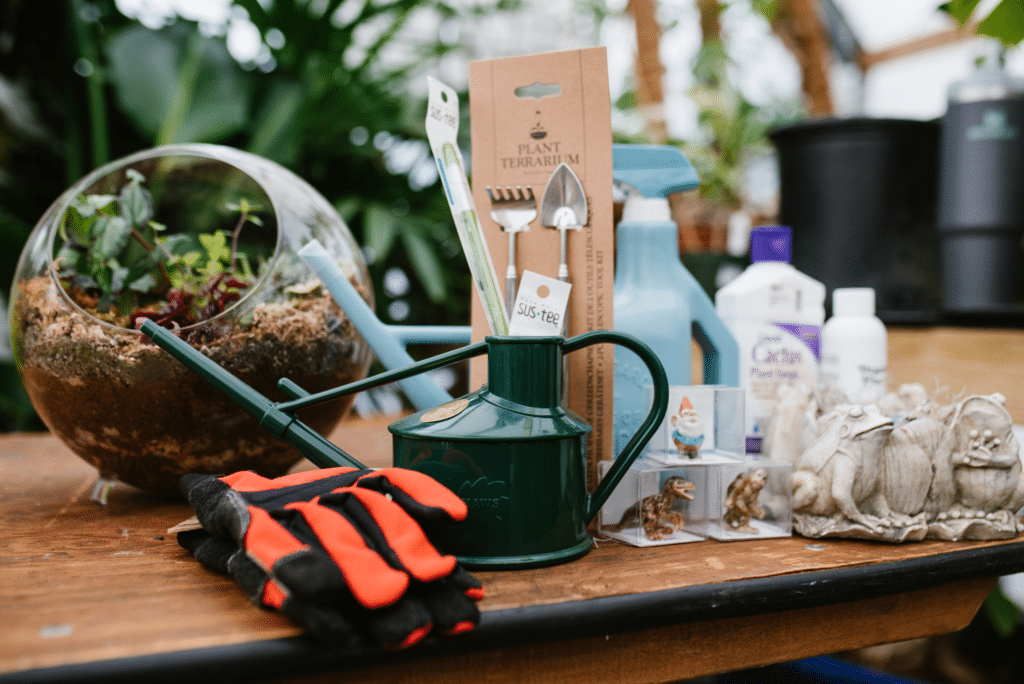
Gardens of Babylon Terrarium Supplies
Benefits of terrariums
Terrariums bring a multitude of benefits into your home, creating a harmonious blend of nature and design. Not only do they offer a haven for plants that thrive in a more humid environment, solving the challenge of growing them in dry air, but they also provide a charming confined space for a mini garden to flourish. The efficiency of artificial light, whether it be the warm glow of LEDs or the crisp illumination of fluorescents, can be harnessed to perfection within the glass confines. Plus, the low-maintenance nature of terrariums means you won’t find yourself constantly reaching for the watering can. Beyond the practical advantages, there’s an undeniable joy in curating and caring for your very own mini living ecosystem – a delightful and fulfilling experience that brings the outdoors inside, creating a serene connection between nature and your living space.
Gardens of Babylon Terrarium Building
Types of terrariums
There are two types of terrariums, sealed and open. Sealed terrariums have a removable lid, which is ideal for tropical foliage like ferns, calathea, nerve plants, carnivorous plants, etc. Open terrariums allow air to circulate in the container, which is ideal for plants that need ventilation to thrive (i.e. succulents, cacti, airplants, etc.). Some folks introduce beneficial insects or fauna into their terrariums to create a vivarium – a symbiotic relationship that allows all of the living elements of the ecosystem to help each other live and grow.
Getting started
Before immersing yourself in the realm of terrarium building, take a moment to explore different styles and designs that speak to your unique aesthetic. Be intentional in choosing the type of terrarium, container, and plants that will bring your vision to life – we suggest selecting 2-3 plants to keep things harmonious. With your design in mind, gather all your supplies ahead of time, ensuring a serene and stress-free environment. Now, let’s venture into the step-by-step journey below, transforming your creative vision into a tangible masterpiece that effortlessly blends nature with your distinctive style.
- Start with a layer of drainage rocks, approx. ½ an inch to 2 inches deep, depending on the size of the vessel. This layer acts as a reservoir where the overflow water collects.
- Add a thin layer of activated horticultural charcoal, about ½ an inch, to filter water, break down harmful bacteria, and absorb plant pathogens or toxins.
- Then add your layer of potting soil. Depending on the type of terrarium you’re creating, you’ll either choose a tropical houseplant mix, or a cactus mix. Each soil type is specially formulated to provide optimum aeration and drainage, along with microbes that promote root growth for healthier plants.
- Next, you can play around with the arrangement of your plants within your vessel. Remember, there is no rule in creating and placing plants in your terrarium! You can create a landscape with pebble walkways, a whimsical nook for a fairy or gnome to relax, or a calming desert oasis that reminds you of your favorite vacation spot!
- Finally, now it’s time to add your plants! Start with the largest plant first, and work your way to the smallest. You can use gloves to protect your hands from the prickly plants. Make sure to unravel the roots gently before you nestle them into the soil so that they can find their way through the container and don’t continue to wrap themselves around the plant.
- Once you’re happy with your plant placement, it’s time to accessorize! Add in decorative elements like preserved moss, gemstones, figurines, driftwood, top rocks or desert sand to make it personalized and unique to your aesthetic!
Care
Terrariums, with their captivating greenery enclosed in glass, bring a touch of nature into our homes, and while they’re generally low maintenance, a few thoughtful steps can ensure their longevity and vibrancy. Picture it as cultivating a small piece of the outdoors within the sanctuary of your living space. So, let’s dive into some suggestions to nurture your terrarium and keep it flourishing
- Watering needs:
- For open desert terrariums, the easiest way to assess for watering needs is to feel the leaves or foliage of the succulents and cacti. If the leaves feel limp, wilted, wrinkly or look pale in color, the plant needs a thorough drink of water. Once the leaves are plump, firm, and look vibrant in color again, this is an indication that the plant is well watered. For closed tropical terrariums, feel the soil, and make note of any condensation on the glass. The leaves may droop if they’re thirsty.
- A well-watered closed terrarium will have condensation on the inside of the glass and the soil will have a light sheen of moisture on the top. If you’re not seeing any condensation at all, or if you see any dead leaves or dry soil, you may need to add a little bit of moisture into the environment.
- Light needs:
- Most terrariums will thrive in a bright room where they can get indirect light throughout most of the day. Within 5 feet of an Eastern or Western facing window would be ideal for most terrariums, and a South facing window with a sheer curtain or dappled afternoon sun would be best for desert terrariums that can handle brighter light.
- Be cautious to not place glass terrariums in a spot that receives an abundance of direct sunlight, this can magnify the sun rays and potentially burn your plants!
- Pest control:
- If you have an open terrarium, monitor for pests such as gnats or mealy bugs. If you have a closed terrarium, you may want to remove the lid every now and then to let in some fresh air.
- Excessive moisture can cause issues like root rot or mold, and can also attract pests such as fungus gnats. If your closed terrarium has heavy water droplets and dark, consistently wet soil, it would be best to leave the container open and let it dry out a bit before sealing it again.
- Other tips:
- Rotate your containers every so often for even growth on all sides of the plant.
- Make sure to remove yellow and brown leaves from any plants in your terrarium.
- Since terrariums don’t have the capacity to break down dead organic matter in the way that a forest floor does, the dead leaves will likely sit there, rot, and potentially spread pathogens to your plants or soil, so it’s best to remove any dead matter as soon as you can.
by Emily Vogler | Apr 11, 2023
If you’re looking for low–maintenance plants that are easy to care for and provides a pop of color to your home, cacti and succulents are the perfect choice. With their intricate and unique shapes and vibrant blooms, these plants can bring a lot of personality to any space. Though they’re often thought of as desert plants, cacti & succulents actually come in a wide range of shapes, sizes, and colors, making them ideal for any kind of home décor. The care for these plants is fairly straightforward, but there are some tips and tricks to help keep your plants healthy and happy. Here’s what you need to know to get started:
1. Choose the right pot
When selecting a pot for your cactus, make sure it has plenty of drainage holes. Cacti don’t like to sit in soggy soil, so it’s important to make sure the pot has enough holes for water to escape. Succulents should be repotted every few years to ensure they have enough room to grow. Choose a pot that is only slightly larger than the existing one, and use a well-draining succulent soil mix.
2. Pick the right soil
Look for a special cactus potting mix that contains a combination of sand, peat moss, and perlite to help promote good drainage.
3. Get the lighting right
Most cacti thrive in bright, indirect sunlight. If you’re not sure where to place your plants, pay attention to how much light the area receives throughout the day. Succulents need plenty of bright, indirect sunlight to thrive. Place your succulents near a window that gets at least 6-8 hours of indirect sunlight each day.
4. Water, but not too much
Cacti need regular watering during their active growing season, but you should reduce this during the winter months. Be sure to water your cacti thoroughly, and then allow the soil to dry out completely before watering again. When it comes to succulents, less is more. Overwatering succulents can cause them to rot or become soggy and die. Aim to water your succulents once every two to three weeks, and make sure to let the soil dry out completely between waterings.
5. Fertilize
If you want to give your cacti a boost, consider giving them a light dose of fertilizer once a year. Look for a fertilizer specially formulated for cacti, and follow the instructions on the package. Succulents don’t require much fertilizer, but you can give them a light dose of a balanced fertilizer every few months.
by Emily Vogler | Apr 4, 2023
Gardens of Babylon can help with all your irrigation needs – CLICK HERE FOR A FREE CONSULTATION.
A landscape needs three things to thrive: ample sunlight, fertile soil, and sufficient water to keep turfgrass and garden plants alive. For many homeowners, the water is the hardest thing to manage. Hauling hoses and sprinklers around the yard and garden beds is a chore, especially in oppressive mid-summer heat.
“The biggest advantage, if you have a system set up correctly and a good watering schedule, is that the system is taking care of watering needs for you,” says Tim Nebel, Garden of Babylon’s irrigation manager. It also helps save money, he says, when systems can be programmed to provide water as needed, and adjusted to meet different needs throughout the seasons.
After a disappointing experience with a prior provider, the homeowners requested that we take on their irrigation maintenance in 2019:
How did we help?
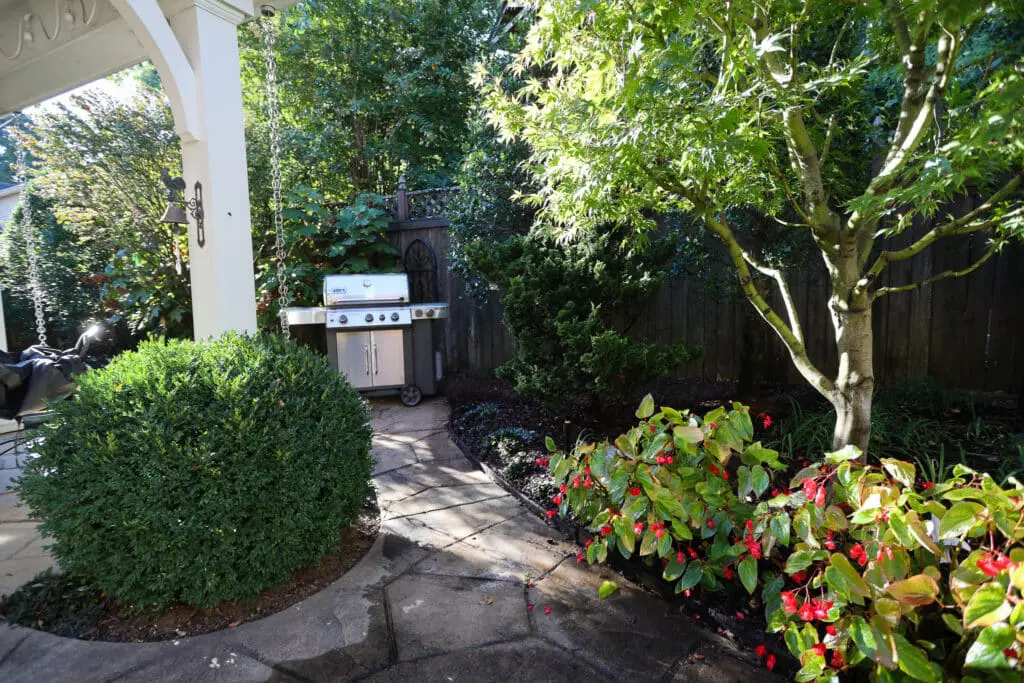
Our designer had been collaborating with them on a fencing installation featuring ‘Little Gem‘ Magnolias, two single–trunk ‘Natchez‘ Crape Myrtles to create a shaded canopy above a flagstone walkway, and a River Birch tree near the driveway.
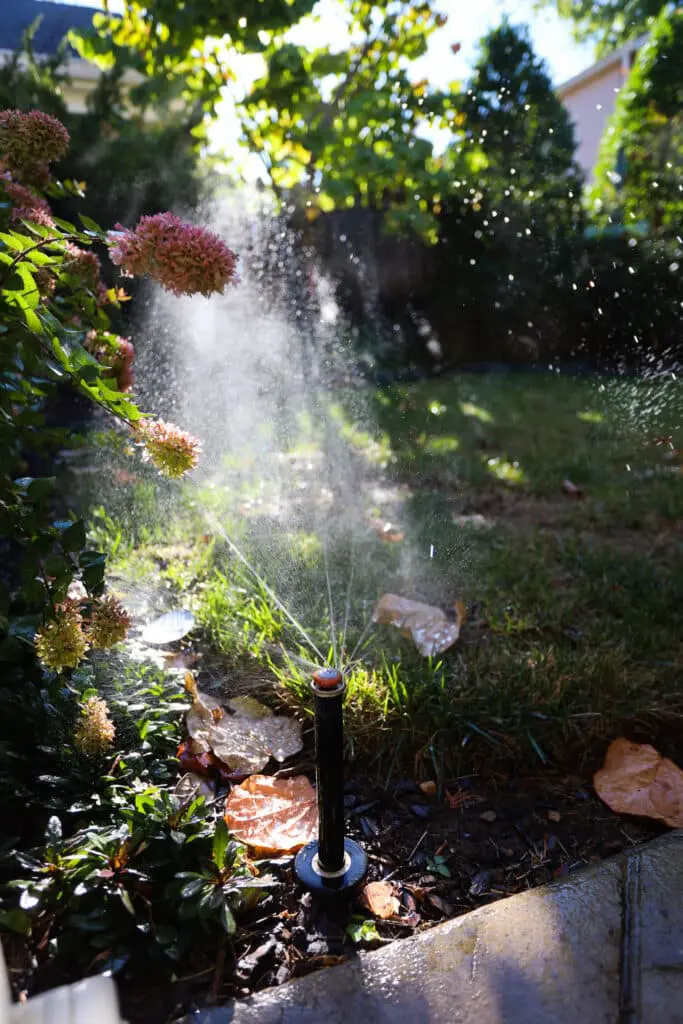
Since the trees were positioned throughout the lawn–as opposed to being planted in a grouping within a garden bed–the challenge was to ensure that both trees and lawn would receive adequate moisture season to season. In this case, high-efficiency MP rotator nozzles were used in lieu of standard rotor heads. The spray pattern of an MP rotator provided superior coverage for the trees than a rotor could have, while still being an appropriate choice to evenly water the grass. The rotors are set to run for a longer period of time, while other nozzles with different spraying functions are also used.
Setting an irrigation schedule–particularly for a landscape with unique plantings and custom contours–is never a one-and-done task. Monitoring the performance of the system as the weather fluctuates over the year is key. To address this situation, the homeowners elected our gold irrigation maintenance package which includes four yearly services: a spring startup, two seasonal adjustments & inspections, and one winterization. The seasonal adjustment/inspections gave us an opportunity to gather information over time, and develop a schedule particular to their yard.
Want to learn why our irrigation program is head and shoulders above the rest? Click here to watch the video! Gardens of Babylon installs and maintains irrigation systems, and offers different maintenance package levels for landscapes of all sizes. Click here to learn more about the systems and book a consultation.
by Emily Vogler | Apr 1, 2023
Spring has officially sprung! What’s the next step for your landscaping? For many gardeners, April is the start of the gardening season. Check out these easy tips to get your yard in shape:
- Re-seed the damaged or bare areas of the lawn.
- Mow established cool-season turf grasses weekly or as needed; raise mower height to three to four inches.
- Contact us for a quote on lawn care. We can help by first completing a soil test to find out the actual composition of your soil. This test measures the soil’s pH level and points out nutrient deficiencies, and is the best way to know the next steps to take to improve the growing conditions in your landscape.
- Replace or refresh mulch around plants.
- Prune spring blooming shrubs and vines after they finish flowering. Allow foliage on spring bulbs to die back and dry before removing, so it can store food for next year. If you would like our help, our team can do a seasonal clean-up for you!
- Plant ground covers and warm-season annuals and perennials as soil temperatures warm and the danger of frost has passed. You can find all your gardening needs at our garden center!
- Check roses, ornamentals and vegetables for powdery mildew, prevalent in mild, moist spring weather.
- Check new growth on ornamental plants weekly for aphids and scale insects and treat with a natural pesticide, if necessary.
- Water all your plants when they’re dry, but be particularly diligent with new plantings that can quickly dry out in our persistent spring winds.
- Start up and test your irrigation system.
To begin your next project, schedule a phone consultation!
If you would like to work with your existing designer, simply fill in their name in the “Project Details” section.
by Emily Vogler | Mar 17, 2023
–
Concerned that your evergreens have been permanently lost to the cold? Are you unsure of what to do next to replace your frost–ravaged shrubs? Worry no longer! Our VP of Operations, Dana, has the answers. In this video, she goes over three great varieties of plants that will serve as a brilliant replacement for any evergreens that didn‘t survive the winter chill. Here’s her recommendations:
1. Florida Anise
Florida Anise is an evergreen tree native to the southeastern United States. It produces clusters of small flowers in the late winter and early spring. The tree can reach heights of up to 15 feet and produces a sweet, licorice–like aroma when its leaves and berries are crushed. Historically, the tree has been used to make medicines, flavorings, and dyes. Its dried berries are often used to flavor fish, soups, and other dishes, while its oil is used in perfumes and soaps. Florida anise is also known for its ornamental value, as its glossy leaves and fragrant blossoms make it an attractive addition to any garden. It’s hardy from zones 6 to 9 so it’s going to be a great substitute for those Schip Laurels that you’ve had in your yard forever!
—
2. Plum Yews
Another plant that didn’t get nipped by the frost was the Plum Yews. They did very well throughout the cold, so planting more of those would be a great replacement evergreen. They’re native to East Asia and parts of the Himalayas, so they can really take the cold. They’re hardy from zones 6-9. It is an attractive shrub with glossy, dark–green leaves and clusters of white flowers in spring. The fragrant flowers have a sweet, fruity smell and are often used in perfumes and potpourri. Plum Yew is also used in traditional Chinese medicine to treat fever, colds, and headaches. It has been used in landscaping for centuries and is a popular choice for hedges, foundation plantings, and borders. Plum Yew is an easy–care plant that is tolerant of most soil types and does not require much pruning or maintenance.
—
3. Spirea
Another plant that survived the cold is Spirea. They are an heirloom plant, meaning that it has been passed down through generations, typically saved by family members due to its sentimental value. Heirloom plants are open–pollinated varieties, meaning they are pollinated by natural means such as wind, birds, insects, or other plants, rather than through human intervention. Spirea is hardy from zones 4-8, and produce small clusters of white, pink, red, or purple blossoms. The shrubs are usually deciduous, meaning they lose their leaves in the winter, but some varieties are evergreen. Spirea grows best in full sun, with fertile, well-drained soil, and regular watering. These shrubs are easy to care for and have few pest or disease problems. They are a great choice for low-maintenance landscaping and can be used to create a colorful, flowering hedge or border. Spirea is also a great choice for container gardening and can be pruned to create a desired shape.
To conclude, what we’ve learned through the frost is that sometimes, the best plant options are ones that have stood the test of time. Heirloom plants your grandmother may have had growing in her garden are still there for a reason!
Watch the full video here: